Standard SearchMaster searching
Advanced Search Master Searching
Update Document, (Create new revision)
Document View Buttons and their functions.
Launch Document in Microsoft Word
OCR/Thumbnail Scanned PDF Documents
Move Document to another folder
Company Created Document Workflow Procedures
Normal Document Workflow Actions
Quick Work Flow buttons are available when no standard workflows setup in this area.
Classification Search, or Meta Data Search
Committees and Meetings Module
Adding Users to the Committee folder manually
Multiple Choice questions to confirm
Create a New Security Break in File Plan
Create a New Library Workflow Task
Document Creation for Web Site
Figure 2 - Main Welcome Screen
Figure 3 - My Workspace Reporter
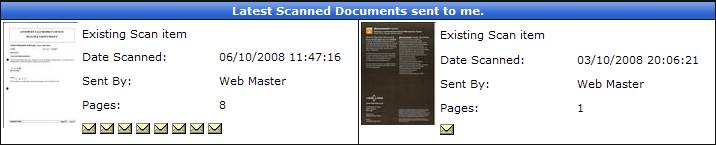
Figure 5 - Latest Scanned Documents Sent to me
Figure 6 - Latest Approved Document in System
Figure 10 - Add Class Shortcut
Figure 11 - Add My Folder Link
Figure 12 - Add Document to Folder
Figure 13 - Search Master Results 1
Figure 14 - Search Master Results
Figure 15 - Document/Meta Data Searching 1
Figure 16 - Document/Meta Data Searching Keys
Figure 18 - File Plan Folder Searching
Figure 19 - Document Folder Explore
Figure 23 - All Document Action Buttons
Figure 24 - Document Access Panel
Figure 28 - Document Copy shortcut
Figure 30 - Workflow – Meta Data Incomplete
Figure 32 - Workflow Launch Link
Figure 33 - Workflow Approval Panel
This document has been produced to act as a reference for the usage of the software and also to give developers an insight into why it was designed this way and how to continue development, or incorporate the system into your own developments.
You can contact me at stevejones@web-labs.co.uk or clusteruk@hotmail.com if you want to discuss issues with this software.
Version Date Description Author
1.02 April 2009 update content Stephen Jones
1.01 November 2007 first release Stephen Jones
This document will be updated when the software changes and will form the basis for the online help within document Master.
This is the user guide for the Document Master product from Weblabs which was written to help you get to grips with it as quickly as possible. It is aimed at all users, and hopefully, will be easy to understand and use, if not then contact us at Weblabs using the links in the chapter above to tell us what is difficult and we will endeavour to make it easier to use.
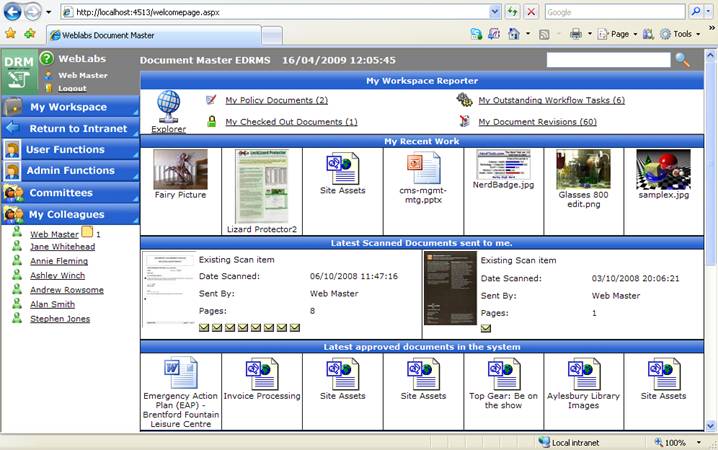
Figure 2 - Main Welcome Screen
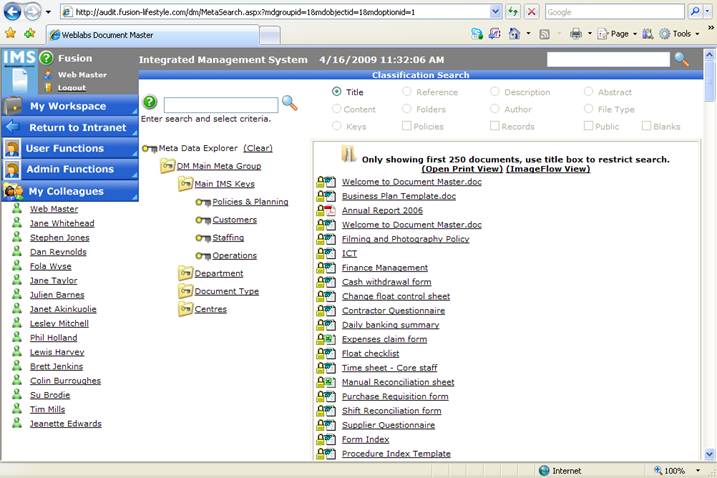
This is reached by clicking the logo in the top left hand corner, in this case the green DRM logo from wherever you are in the system. You will see three main areas, the left hand menu bar which is always available, the Search Master box at the top right and the main panel in the rest of the area.
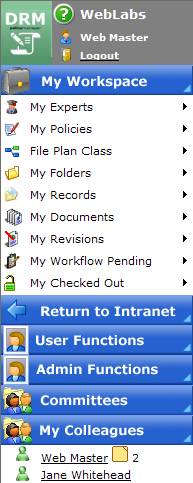
The left hand menu bar holds the main site navigation for the entire system; these are accessed by moving the mouse over the blue title bar. The most important of these is the My Workspace area. The menu selection can take a bit of getting used to but it is worth persevering with it as it will speed you to your work as soon as you need it.
Not all these section will be available, only when there is data to show but there are four main sections.
|
|
|
This section gives you a quick list of items that relate to your work in progress and what is outstanding. However the globe link on the left takes you directly to the document file plan explorer. Note that the link for your specific inbox, workflows etc. only appear if there is something in there so you know to check them out. |
|
|
|
|
|
Any new work you create that is not signed off appears in this box, by default it is set to 6 but can be higher, although this is a global setting and not an individual setting as yet. The latest updated document appears on the left so you can always jump straight to the last one you worked on. These also appear in the MyRevisions menu. |
|
Figure 5 - Latest Scanned Documents Sent to me |
|
This section is only shown if you or your company use the Document Master scanner support application. This then sends these scans to users like a mail inbox so that you can view them and move into various documents.
|
|
|
|
The latest approved documents in the system appear in this box, this is so you can always see the latest documents signed off by other users. Note: it will only show documents that you are allowed to read. |
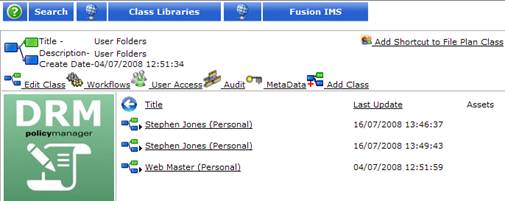
My Workspace is probably one of the most important parts of the entire system. It aims to let you have almost instant access to your documents and areas you are interested within the system simply and efficiently. It does this by allowing you to attach objects in the system to your account by simply clicking on an “Add to My” link throughout the system. For example, “Add to My Folders” etc. Once you have mastered this, you will be able to get to the work and documents that you need to access much quicker. Please spend time getting used to this functionality as it will save you huge amounts of time in the medium to long term.
|
|
Here are the links to parts of the system that we use on a regular basis, think of them like Windows shortcuts that are attached to your account and that allow you to jump straight to a folder, workflow or a document that you are working on or are interested in.
To navigate just move the mouse over the black arrows on the right hand side and choose a link.
We will return to this throughout the manual when we attach objects.
|
|
|
My ClassesThis is the MyClasses link, think of it as a pointer to different Main sections of the library. Sometimes it has a different title as you can see in main picture. This is so companies can call the system something else. |
|
|
My FoldersThe MyFolders section is the one you will use the most, attaching folders that you are interested in so you can navigate to instantly. |
|
|
My DocumentsThe MyDocuments selector is where you will attach documents that you are interested in. When a new version is released you will receive a message to tell you there is an update. |
|
|
My RevisionsWhenever you create a new document, a link is created in this section so that you can jump back immediately. When the document is signed of to go live this is removed and added to MyDocuments automatically. |
|
|
My Workflow PendingWhenever a workflow is launched and it is your turn to approve an action, a link will appear here for you to jump to and action accordingly. It may be that you are a member of a group of approvers so you may get beaten to the approval process. |
|
|
My Checked Out DocumentsWhen you are working on a document and others are involved, you should check it out while updating it. This will stop other users from overwriting this version at the same time. Be sure to check back in when finished. |
|
|
My ExpertsWhen a document is created, the people who read these documents can rate it to show whether it is a good document or not. When you rate a document, the author is attached to this section so you can instantly view their rating status and all of their documents. |
|
|
My PoliciesWhen a document, for example a company safety procedure is created and changed to a policy, groups of users are selected that must either tick a check box to say they have read it, or answer multiple choice question to prove understanding. This shows those that you have not agreed understanding and need to read and confirm it be that in a tick box or a multiple choice questionnaire. |
|
|
Ignore the Admin tools page unless you are an Administrator, however, at the end of this manual are some admin functions.
The MyColleagues section is where you attach people you deal with and allows instant messaging from within the system. |
|
|
|
|
|
Click on the Explorer icon in the main home page
|
|
|
Or the User Functions option for the File Explorer
|
|
This is designed to work like the file explorer in Vista enabling you to navigate through, but always have the route behind listed in the menus above.
Click on the
|
|
|
|
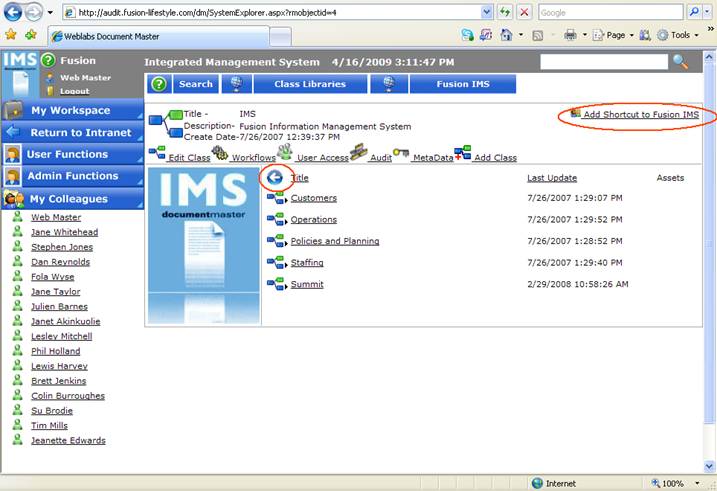
Carry on clicking the link through until you reach the folders you are interested in, Figure 11. Note the Add to My Folder link circled. Note that the folders are different to the class links.
|
|
Figure 11 - Add My Folder Link
|
|
Here in Figure 11, you can see the folders and one looks like it has a document inside it. This folder contains documents, so we select it so that we can add a document in this folder.
|
|
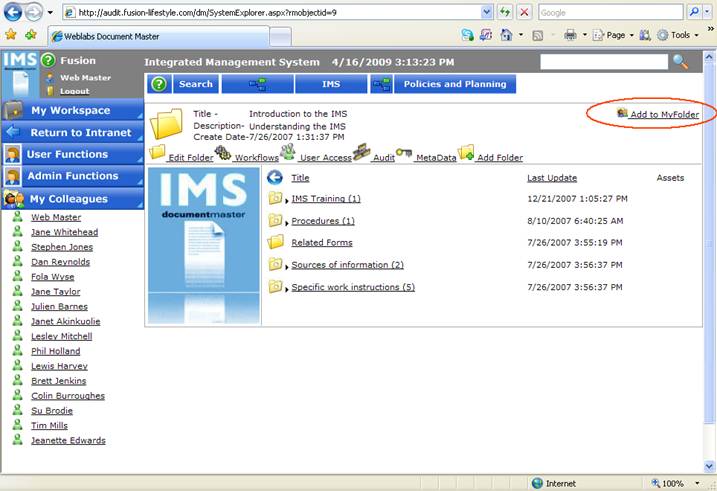
Figure 12 - Add Document to Folder
|
|
In Figure 12 you can see the documents stored in this folder; the padlock means that this document is a signed off live revision. You can go into this document and view or create new revision if you have the appropriate rights.
The Red circle is around the Add document link, if you have editor rights you can create a document in this folder by clicking on it. We will return to this later.
|
|
|
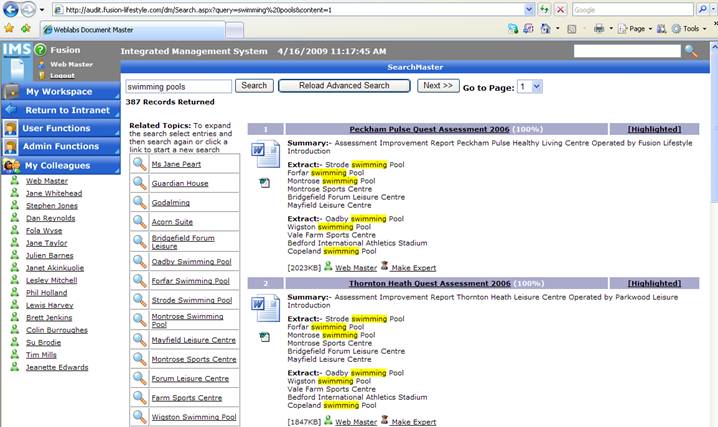
The main way of searching is through the Search Master box at the top right hand corner of all pages. This is now demonstrated followed by the Meta Data search tool for finer document data searching instead of the Search Master content searching. The site administrator can change the priority to make the Document Data search the default by modifying the system configuration file.
|
First type into the Search Master box
|
|
The results appear as below, note the extracts, summaries and related topics.
|
|
|
|
|
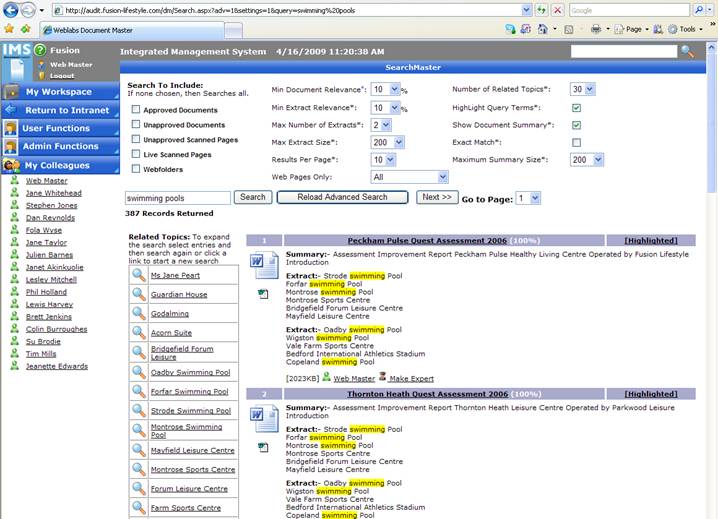
Advanced Search Master Searching
Now select the ‘Reload Advanced’ Search button for more options, this will enable fine tuning of the search.
Figure 14 - Search Master Results
|
|
|
|
|
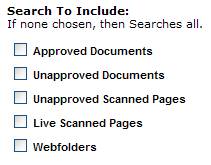
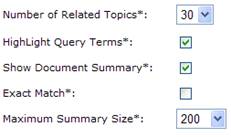
This allows you to choose certain groups of document.
Important note: In the future this list may change to reflect only the live approved documents. |
|
|
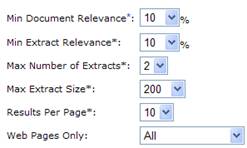
Minimum Document relevance is an internal calculation to how relevant the document is to the search string you entered. You can adjust this relevance here.
Minimum Extract relevance is the same but for the extract shown.
How many extracts the search returns.
Character size of extracts returned
Number of document per page returned, a drop down allows you to view the next page of results.
Web pages are set to ALL, but can just search document master documents.
|
|
|
Numbers of related topics are the alternative terms listed to the left of the results page. These are picked up from an understanding of the search query and what is in returned documents. So if searching on red wines, then burgundy or wine glasses may be suggested.
Highlight the words found in the search results.
Hide or show summary.
Exact match does literally match the words. However leaving un ticked means SearchMaster will try and find similar words. This is a two edged sword and removes some of SearchMaster’s most powerful attributes.
Size of the summary in characters. |
|
|
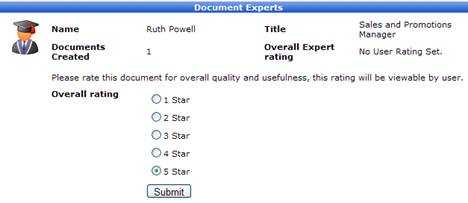
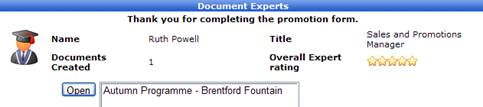
Make ExpertWhere you see this link you can mark the quality of the document and keep this author in your “My Experts” shortcuts.
Now when you visit this user again.
You can see their rating and open their documents.
|
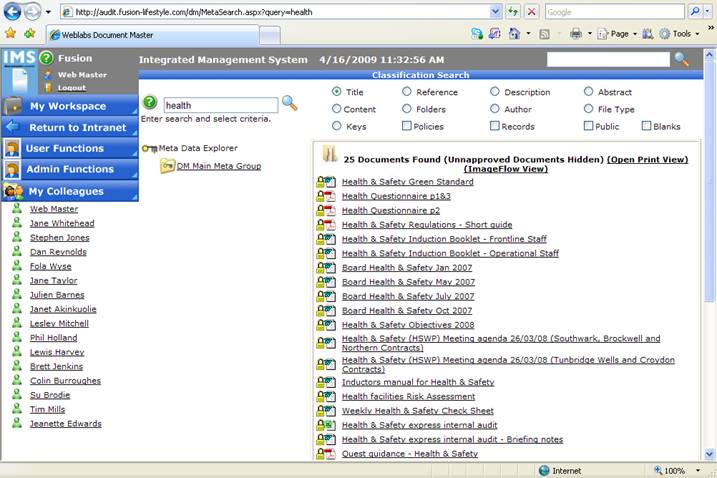
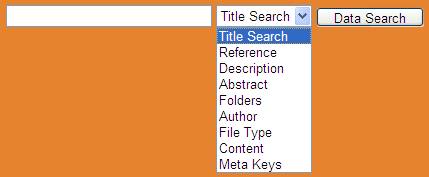
This is the section that you search on data about the document and not the actual content of the document. This is useful because it is like when you used to go to the library and search through the library cards looking for the title, author, category etc. Well this lists all of the library cards that have this data attached so you have less to look through.
In the ![]() menu, select the
menu, select the ![]() link to open.
link to open.
|
Here you can see that I have typed “health” and I have selected the Title field. I can also search the Reference, Description, and Abstract etc. Note: the Description and Abstract can be slow searches. The ‘Blanks’ (Slow) option shows documents that are shells only and contain no assets, files or pages, just the framework and Meta Data. This is useful where documents are not ready but the system needs to know it is being worked on and meta data assigned. Select ‘Records’ for documents that are assigned as such.
To change the search type just select another radio button, for example, Author, so you can look for all document written by a specific person, or File Type so you can enter image etc. . |
|
Figure 15 - Document/Meta Data Searching 1
|
|
Meta Data Searching
By clicking on the
|
|
|
|
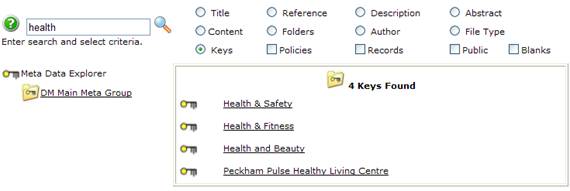
If you have a large number of Meta Keys in your system, we can select the “Key Title” radio button to search for keys. This lists keys with the search string contained which we can then select to search.
|
|
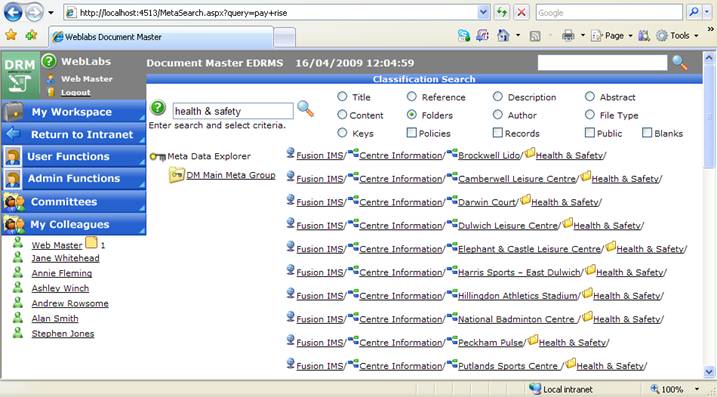
We can select the folders option to search all parts of the system file plan with the part of the search string contained as below. Note it shows the complete path leading up to the folder or class we have searched. We can now click on any part of the paths to go into that area.
|
|
Figure 18 - File Plan Folder Searching
|
This is an overview of the process involved in creating a document, editing and launching various workflow such as approving, deleting, giving public access through the CMS etc. It also covers some key areas like adding sticky notes and adding users to your document edit rights for collaborative group working.
There will be confusion from some people about how we handle and describe documents with Document Master. When you create a document in DocumentMaster, what you are actually doing is creating a digital Document Binder that can hold a single Word document or a spreadsheet etc. However, it can also hold a number of images, a video, and a presentation script in word format all within the same binder. So what we call a document is actually a holder for one or more digital documents or assets that can be worked on as one object and signed of together.
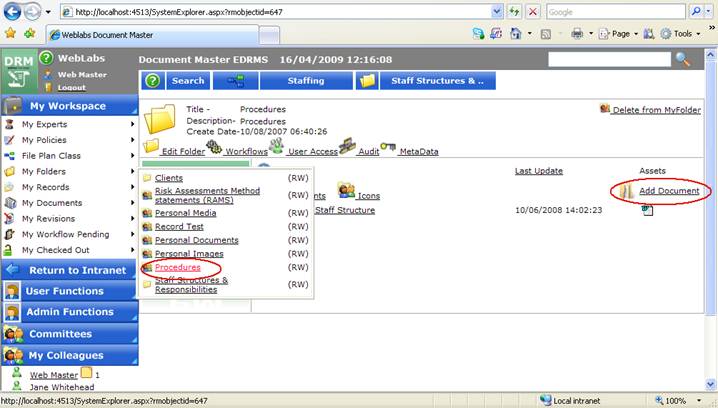
Figure 19 - Document Folder Explore
This is where it all starts, within the File Plan
explorer. Navigate to the folder that you want to load the document into and
then click on the ![]() button highlighted above. This will
launch the document creator panel and allow you to upload your document.
button highlighted above. This will
launch the document creator panel and allow you to upload your document.
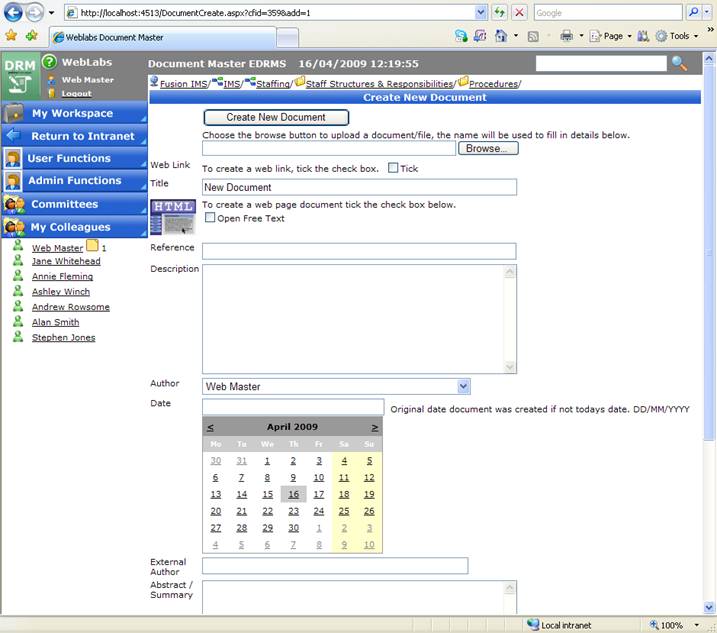
Now you have this screen open, Figure 20, select the Browse button which will allow you to find the file on your computer or network and select it. You can at this stage press the Create New Document button, it will then copy this digital asset to the folder selected and the title and description will be created from the file name.
However, you can enter the Title, Reference and Description etc that the system holds to find these documents at this point if you choose. Alternatively these can be modified at a later date by clicking on the Edit Doc button in the Document Viewer page.
Administrators function. In this document creation page you will see the Web Link option, Figure 21; this allows you to create a document that has the functionality of a link to a web site. The reason for this is mainly to create what we call web folders which are areas in the system where you can put mini web sites that Search Master can index for searching. These are put in the Web Folders root drawer if they are to be indexed. Speak to an administrator about these. Also you can point to external web sites and index them, they will then appear in your system. One more thing that is popular, is that you can point to a document held on another system or site and treat it like it was on your own. It can even be tagged, and put through a normal approval process.
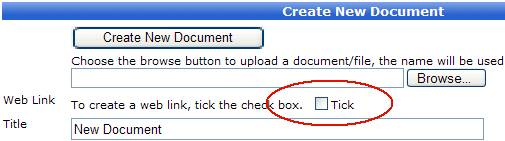
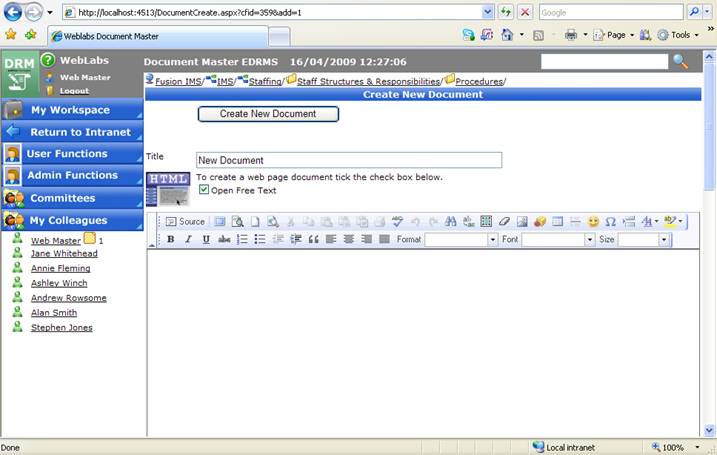
Open this to enter your content without the need of a word processing application. This acts and feels like most modern word processors and is a great way to create content within the system.
Once uploaded you are brought to the Document View page.
Note that when uploading a new document it can be any file
type. Most of these file types have an associated icon, but if you see the ![]() icon that
does not mean that this file is not supported, just that there is no icon for
it in the system. Just contact your administrator to have new icons uploads.
icon that
does not mean that this file is not supported, just that there is no icon for
it in the system. Just contact your administrator to have new icons uploads.
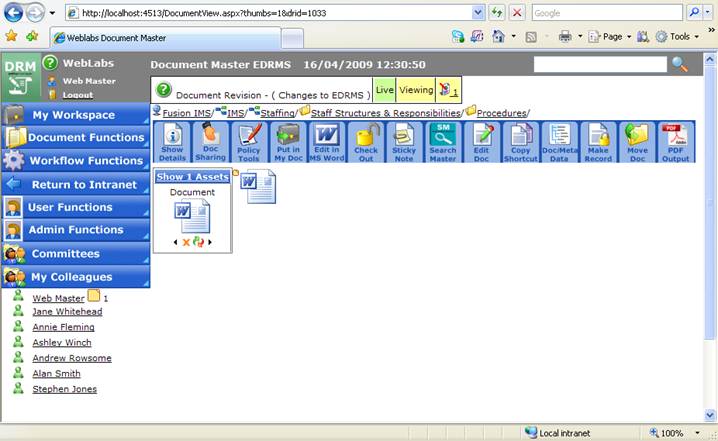
Here you can see the page uploaded, click on the “Show Details” button to get the document details panel open. This gives you an instant view of all document data and storage space used. At the top of the page are the document revision title, and the list of revisions in this document. Clicking on the numbers will take you to the appropriate revision. The ones with the lock are signed off or approved versions, the one with the green background is the live version and the yellow background signifies the one you are viewing.
What if you want to make changes to any document or asset within it, look at figure 22 and see the Word asset? Underneath the word icon are 4 small action icons. Remember some documents have a lot of assets so remember to update the correct asset.
Click on
the ![]() icon
to bring up the replace panel.
icon
to bring up the replace panel.

Press on the browse button and find the file to replace this asset, on your machine. Click the replace function and it will replace the old asset with the new file you have uploaded. Remember this will delete the old version, if you wish to keep it, you must approve that version and create a new revision.
You will notice in the Document View page that on the left of the document details panel is the document Asset viewer panel. The asset viewer only shows the first 20 assets in any document, but if more a link will appear to allow you to view all.
|
|
Asset DisplayThis is the asset view of a document with a single asset, in this case a Word document. However, it could have many different assets to make up this document project. We will show just one and explain the buttons underneath it. |
|
|
Asset order ButtonsThese buttons allow you to change the order of the assets within the document binder. The left arrow lowers the asset number and the right raises it. The Asset, numbered one, is always shown whenever a document is searched and is the basis of the document binder. Asset two should be an image if possible as it will be your default image for the document. |
|
|
Asset Delete ButtonThis allows you to delete this asset from the document binder, note when you do this you must click the Confirm Delete button in the document view, see document viewer buttons for explanation. |
|
|
Asset Replacement ButtonThis button enables the user to replace any asset in the system. Just click on it and the file upload box appears. Just select the new asset and press the replace button. This will then re-index this asset and remove the old index in SearchMaster. |
|
|
Image Asset ViewerThis button changes the document viewer page to allow you to view an image asset, or maybe download it. Note that if copyright protection has been assigned to this document then unless the creator has assigned you rights to view it, you will see a watermark over the top. When clicked, this bar will be displayed above the image.
Click on any of the 25%-100% buttons to view at that scale, or press the Download file button to get the full image on your computer.
|
|
|
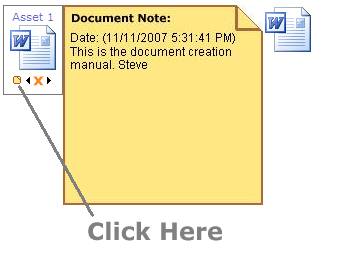
Sticky Note AttachedThis icon means that this asset has a new sticky note attached to it. Click on it and the latest note for this asset will be displayed. For previous notes view the Document Revision Audit trail link in the left hand document functions bar.
|
|
|
View all Images in DocumentUse this button to open the image you want using an iTunes type viewer. |
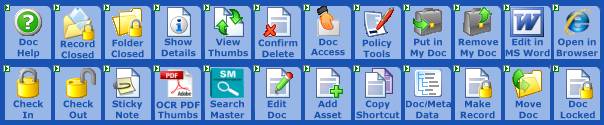

Figure 23 - All Document Action Buttons
|
|
Doc HelpClick this button to view the flash movie walk through of the basic features of Document Master.
|
|
|
Record ClosedThis shows that the record that holds this document is closed, and as such no documents can be added or modified etc.
|
|
|
Folder ClosedThis shows that the folder that holds this document is closed, and as such no documents can be added or modified etc.
|
|
|
Show DetailsAll document details are displayed in this panel.
|
|
|
View ThumbnailsThis button just takes you back to the basic view so you can view the thumbnails and view the assets within this document binder.
|
|
|
Confirm Deletion of AssetIf you are deleting an asset, this button will pop into the display to make you confirm deletion of it.
|
|
|
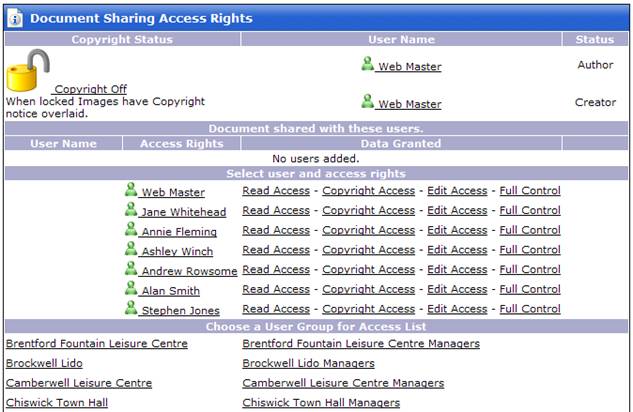
Document AccessThis takes you to the document security screen, this is the place where you can give individual users access to your document.
Figure 24 - Document Access Panel
Click on the Read/Copyright/Edit/Full control links for any user that you wish to give access. The copyright access allows for removing the watermark on copyright protected images. These rights are independent of the security rights setup in the file plan. The initial list of users is the one from your MyColleagues list. However, if you want to list different groups you can click on the groups lower down and their list of name will be displayed to allow you to choose. Full control means that the user can also launch workflows.
|
|
|
Policy ToolsPolicy tools are an optional module that enables an administrator to create a confirmed reading system. Users selected must tick a box to prove that they have read or understood the document, or alternatively answer a multiple choice questionnaire about the document. |
|
|
Add to My DocumentClick on this icon to add this document to your MyDocuments list, this will enable quick navigation to this document. Also, whenever a new version is created a message will be sent to you updating you on the new revision.
|
|
|
Remove from My DocumentAs above but remove.
|
|
|
Launch Document in Microsoft WordClick this button to launch the document into Microsoft word. To do this you need to have the Word plug-in from your administrator installed in the word templates folder on your computer. If you do have it then the long file name in the title bar includes all login details for word to be able to resave back into document master, as it resaves the file it replaces the title correctly.
|
|
|
Open Word document in BrowserThis button opens an html version of the word document in your browser. It is only a representation and may lose some formatting or characters. This only works when the Word plug-in is set up to create this HTML version for you. |
|
|
Check out DocumentThis button allows you to lock a document so that only you can edit it when you have multiple users allowed to work on it. Also a new menu will appear in the MyWorkspace menu called My Checkout.
|
|
|
Check in DocumentAs above but checking document back in.
|
|
|
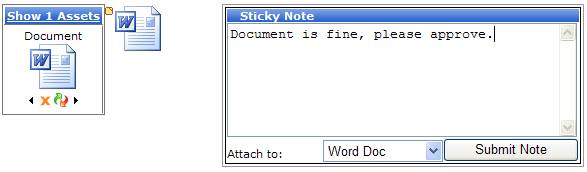
Add Sticky Note to AssetThis allows you to add messages to your assets held within this document binder. All messages are stored in the audit trail and cannot be removed.
Type your message and select the asset number from the drop down and then press the submit button. Then when you click on the Asset message button you can view the message. If you add another it replaces this one and old messages must be viewed from the Revision Audit trail.
|
|
|
OCR/Thumbnail Scanned PDF DocumentsThis button launches an optional tool for extracting thumbnail images for scanned PDF documents so that individual pages can be viewed easily and each page can be OCR’ed and indexed by SearchMaster.
|
|
|
Search Master ToolsThis is a tool for controlling SeachMaster by re-indexing document assets and showing the status.
|
|
|
Edit Document DetailsClick on this page to modify the document details, e.g. Title, description, Author etc.
|
|
|
Add Asset to DocumentThis allows you to add another asset to this document binder. Just like in the Add document page, you click the browse button and select a file from your system and it gets added to the asset list.
|
|
|
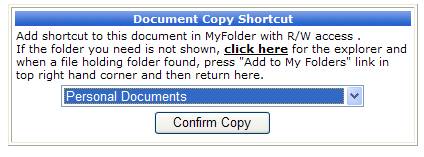
Create Document ShortcutThis will create a shortcut in another folder listed in your MyFolders menu. Just select and confirm, note it does not move the document and whenever you click on the shortcut you will be brought to the original folder.
Figure 28 - Document Copy shortcut
|
|
|
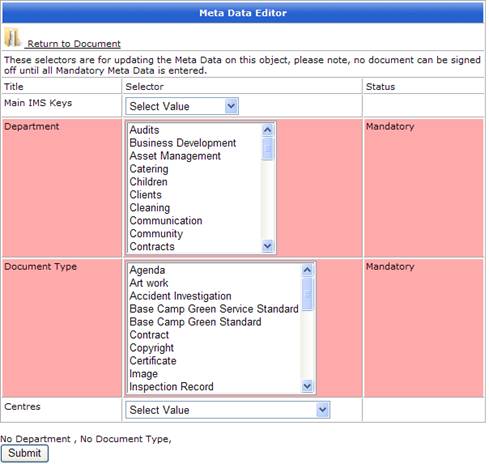
Document/Meta Data editorThe Document/Meta Data button enables the addition of Meta data keys to be added to the document. This enable quick searching using the Doc/Meta data links, by selecting a key, all documents with that key attached are returned.
Select from the different groups of keys to add to your document. Note some are mandatory and if not selected when submitted the background colour changes to red and will not allow you to post without selecting the mandatory group.
|
|
|
|
|
|
Make Document a RecordThis allows you to convert the standard document into a record by creating a new record around your document, or adding your document to an existing record. This gives it the lifecycle that records in this area have. |
|
|
Move Document to another folderLike the shortcut creator, the move document uses the MyFolders list to build the selector to choose a folder. Once selected, the document is moved into this folder completely and the audit trail marked accordingly.
|
|
|
Document LockedThis shows that the document cannot be worked on. This is rarely used.
|
|
|
HTML EditorIf this document has been created with the built in text editor then you can edit it with this button. |
|
|
HTML ViewerThis allows you to see what this page will look like in the web site configured for this area. You can then click on the top left icon to return to editor. This is how to create web page content for the built in web site engine. |
|
|
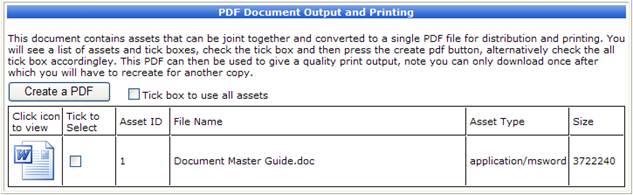
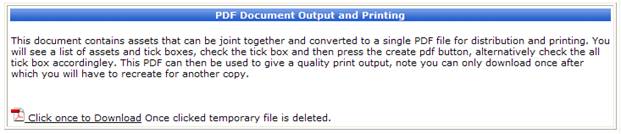
PDF OutputThis function will combine assets within the Document into one PDF file. This is useful for printing in high quality when the assets do not necessarily print well. Note that only assets that can be printed are displayed; just tick the ones to join up in order.
Now click on the PDF link, but note that once clicked the temporary PDF file is deleted.
|
|
|
Workflow ButtonsSee further down at the end of workflow section for quick workflow button in documents. |
Once a document is created and ready to be viewed by others you must launch a workflow to approve it. If the system is setup by an with workflows within this part of the file plan, then these formal workflows are used instead of the quick workflow buttons. The process is straight forward and involves the document creator or author to launch the workflow, which then locks the document as read only and sends a message to the person who needs to approve the workflow. This could be in just one person or a group of people.
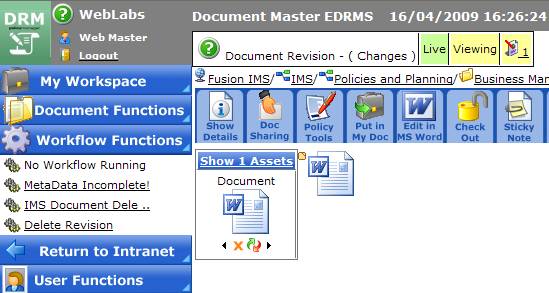
Figure 30 - Workflow – Meta Data Incomplete
Run your mouse over the Workflow functions bar on the left and look for the Approval workflow. The name of the workflow may vary from installation and file plan area to another but should say Approval. However, in this one you can see that the “Metadata Incomplete”. Click on this link and it will take you to the Doc/Meta Data page, see figure 29 above, to enter the mandatory data displayed and allow the document to be approved.
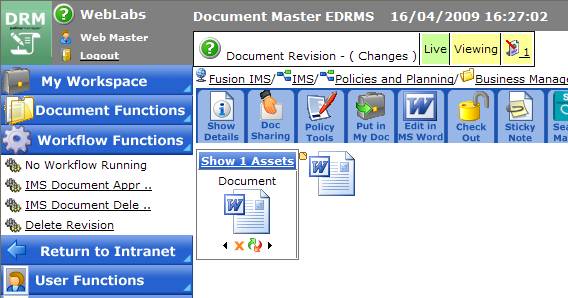
Click on the “IMS Document Approval” link in this case.
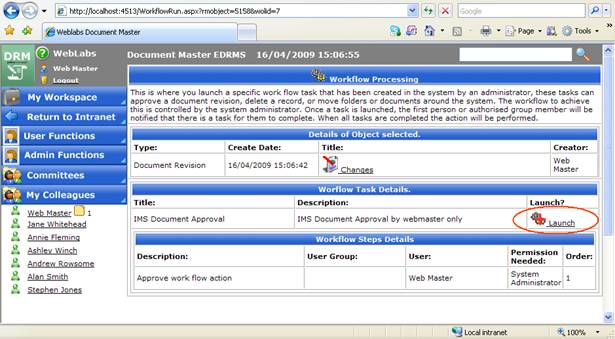
Figure 32 - Workflow Launch Link
Press the launch link on the right.
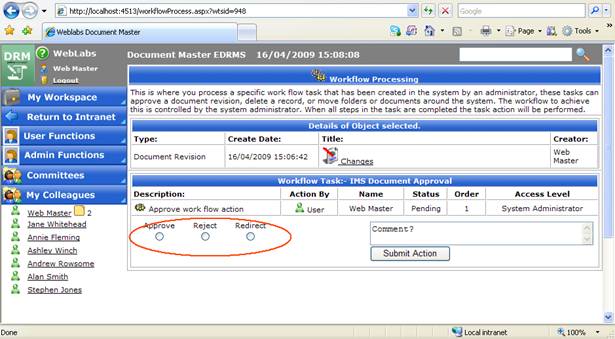
Figure 33 - Workflow Approval Panel
In this occasion I am the next in line so you can see what the next person in the chain can see to confirm the signoff for the approval. Just tick the Approve box, enter a comment and submit. However, you can reject it so that the creator can make changes needed. You can also redirect it to a colleague from your list in MyColleagues.
All other workflows work the same way including the Delete Revision which will delete just the latest unapproved version while leaving any approved documents. The Document Delete will delete all unapproved and approved revision and assets.
The next important workflow is the Create New Revision workflow. This creates a new working revision copy of an approved revision. This can then be worked on and once finished it can be signed off by putting it through for approval again. Once approved this becomes the new live version, and the previous revision is kept for historical record.
A full list of basic workflows at this point in time, more will come on line in later revisions. Note that you may not have them all in your system as they do not all have to be setup, remember if none are setup then the buttons appear for document deletion, approval and make public.
Normal Document Workflow Actions
|
|
|
Approve User Revision
|
Makes available to other users in this area of the file plan to read only. However, you can give other users edit access with the Doc Access button in the document view panel.
|
|
Create new user document revision
|
You will no doubt want to make new versions of the same document to update it over time. This lets you do that by creating a new copy of the same live file. The other users continue to see the previous file until the new one is approved to replace it.
|
|
Reverse approval process
|
On the first time a document is approved, i.e. the first revision you get the option to reverse the approval to make. However on the second revision this workflow is removed.
|
|
Make this document public
|
This enables this document to be a publically viewable document. That means anybody who can see the login page or the Intranet welcome page can view it. Also links to this document can be added to any site to enable viewing, bearing in mind that this system is not behind a firewall.
|
|
User Revision Delete
|
Delete this non approved revision from the document. This will only delete a non-signed off revision.
|
|
User Document Delete
|
This will delete the entire document and all revisions and all assets. It is destructive and not reversible. However, all document audit trail data is kept.
|
Records Workflows Actions
|
Some of these are hidden because records are for keeping; however, when record lifecycle action reaches the time for action they are launched.
|
|
Approve Record Revision
|
This is like the document revision approval except it operates on record documents only. Usually available.
|
|
Create new record revision
|
Again this is like the standard documents create new revision. Usually available.
|
|
Approve all Record Revisions
|
This workflow allows all documents within a record to be signed of in one go. Obviously it only approves the ones that are not already, use with caution. Usually available.
|
|
Record Revision Deletion
|
This allows a document revision that is not approved within a record to be deleted. Sometimes available.
|
|
Record Deletion
|
When a lifecycle of a record reaches the delete end of storage life then a workflow is launched to delete it. Only available to be run when lifecycle rules fire the action.
|
|
Record Document Deletion
|
Allows a record held document to be deleted, setup from main configuration by site admin. Can be useful in some cases. Not usually setup and not recommended. NOTE: If this exists then the system is not a Records Management compliant system and will be marked as such.
|
|
Record Archival
|
This will action when lifecycle actions it, the record and documents contained will be archived and made available to be transported to an archival facility. |
|
|
Delete complete documentThis button will delete assets and revision within this document, be sure that is what you want to do and you must press the confirm delete button to complete the process.
IMPORTANT: If this document is within a Record then the delete function is not available. |
|
|
Approve DocumentPressing this buttons approves this document to be read by other users who have read access to this part of the file plan. |
|
|
Reverse ApprovalUnlocks the document so it can be edited, it is also no longer viewable by the rest of the members of this part of the file plan. |
|
|
New RevisionWhen the document is approved you can create a new revision so that you can make changes without affecting the old version. When finished approve this and it will replace the live. |
|
|
Make this document publicBy clicking this button anybody can read this document and all assets contained without logging into the system. Use this to make documents available to public web site. |
|
|
Reverse Public StatusThis stops the public non logged in user from viewing this document or assets contained within. |
|
|
|
The Quick Start system was designed to allow you to login and get to the basic functions that we want to do quickly and as simple as possible. Most of the time we just want to upload a document and go and rather than load the main welcome screen this Quick Start panel was designed to improve efficiency.
To launch
the quick start system you must activate it, this is accomplished by selecting
the ![]() link
in the User functions panel. This will now activate the Quick Start panel to be
the first thing you see. Note in the next image that there is a check box to
disable it from starting.
link
in the User functions panel. This will now activate the Quick Start panel to be
the first thing you see. Note in the next image that there is a check box to
disable it from starting.

Figure 34 - Quick start main screen
|
|
File UploadThis button allows you to upload any file type into any of your stored folders – MyFolders.
|
||
|
|
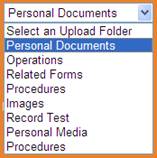
Upon pressing the button this drop down box appears showing a list of all of the folders that you have attached to your workspace in the MyFolders section and that can hold documents or files. Just select a folder and follow on.
|
||
|
Now a button appears to select a file, press it.
|
|||
|
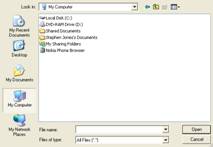
Now you see the Browse button, press that.
|
|||
|
|
Now look for the file from your system to upload (Copy to System) and press open. You can only load one file at a time. |
||
|
Now we have the file press the Upload button, note that this may take some time to upload depending on how fast you network connection and the size of the file you are uploading.
|
|||
|
|
Now this is complete and you can go to the document viewer page or do something else. |
||
|
|
|
|
|
|
|
Create a new DocumentUnlike the standard file upload functionality which creates a document quickly by just loading it to the system, this will guide you through creating other types of document using the document create tool. |
|
|
|
|
|
Press the button and the folder selector appear again, as before choose one of your folders from the MyFolders collection. |
|
|
Now press the create key to launch the document create page for this folder. Now view the Create New Document in the Document Handling section around page 22.
|
|
|
|
|
|
Modify DocumentPressing this button will open the selector containing all the revisions you are working on. These are the documents that have not been approved as yet. Select one and then press the modify button to jump to the relevant document for working on. |
|
|
Search Content of DocumentsSelect this button and type into the box your search phrase; this will use the powerful concept driven search engine to return documents containing highly relevant content. |
|
|
Classification Search, or Meta Data SearchThis allows you to search documents not by the content within but by the data provided about them, a bit like the library cards system but more powerful. This can be by the title, reference, file type, author or many other ways. Also you can search for keys built into the system that get attached to the documents either on a voluntary or mandatory basis.
Firstly press the button
|
|
Now you can select from one of the main fields or select the Meta Keys at the bottom. When you press the data search button you will be taken to the meta data search page which will show the results and modify your search request.
|
|
|
|
Personal FoldersThis will take you to your personal folders collection. However, this is only available if these folders have been created by the site administrator; if not then this button is not available by company policy. |
|
|
Explore SystemThis will take you to the system file plan explorer. See the file plan explorer on page 12. |
|
|
Send Message to colleagueThis allows you to send a simple message to a user colleague along the lines of Messenger and Skype text messaging. These messages use little bandwidth and are stored in system for future reference. Press the button to activate and show the colleague selector drop down box. |
|
In the drop down box is a list of your colleagues. When you select one the text input and send message buttons appear. Type your simple message in and press the button, if however you want more space or to add document attachment links then just press the button without adding a message yet. However, for now just type a small message and press send.
|
|
|
|
|
|
|
Add New ColleagueBecause you may have hundreds of people in your organisation it can be too many to remember them all, so we have the My Colleague shortcuts built into My Workspace. If you want to add a new colleague, press this button to do so.
|
|
|
Select a user from this drop down box. They are organised in alphabetical order from there first name. |
|
Once selected the button appears, so just press to add to your colleagues list.
|
|
|
|
|
|
|
Run WorkflowUse this to launch one of you workflows for approval. On pressing a drop down box will appear with any workflows you need to complete. Select one and follow the instruction.
|
|
|
Logout of SystemThis will terminate your session on the server and log you out of the system. |
|
|
|
|
|
Welcome PageThis will take to document management system welcome page, but whenever you click the top left DRM logo it will bring you back to the quick start page again, see next part to stop the quick start.
|
|
|
Replace Welcome PageIf the
check box is ticked then when you press the top left DRM logo, you will also
return to the quick start page. If you uncheck the box then the quick start
page will be de-activated and will need to be re-enabled in the user
functions bar.
|
|
|
This
means that the quick start bar has been disabled, go to the user functions
menu and select the |
This module is an addition to the Document Master product from Weblabs ltd. To make this manual easy to use it uses screen shots whenever possible to give you a point and click guide, however, it goes without saying the data displayed may vary.
Note that this manual shows Administrator functions which normal users do not see. If you have problems speak to the clerk who is set up as an Administrator to complete this function.
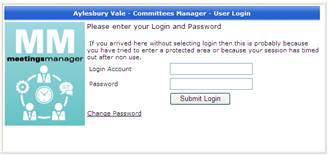
To get us started you need to know where to start so assuming you are at the login page pictured below, enter your Login and Password details that were given to you by the system administrator.
This will now bring you to the main welcome page, note you can return here at any time by clicking on the DRM logo in the top left hand corner of the page.
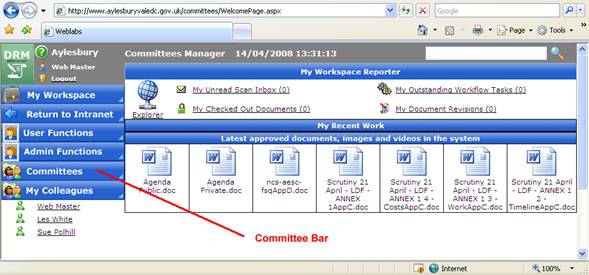
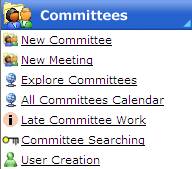
Figure 35 – Committee Panel location
Note the committee bar highlighted in red only appears if your company has this module. Run your mouse over it and you will notice it opens, but it also closes when you come away from it. Hover over one of the following functions listed below and select.
|
|
When you hover over the bar it opens to reveal some options that are specific to the Committees modules.
In order:-
|
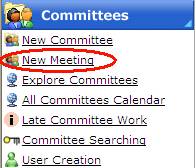
Select the New Committee link in the committees menu bar.
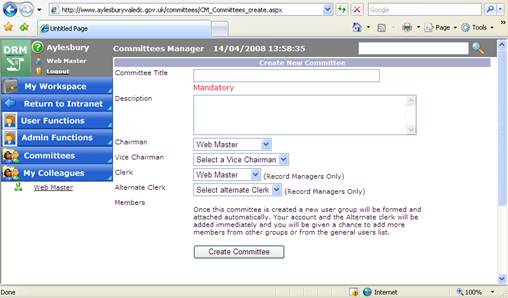
Here you enter the main details for the committee you need to create.
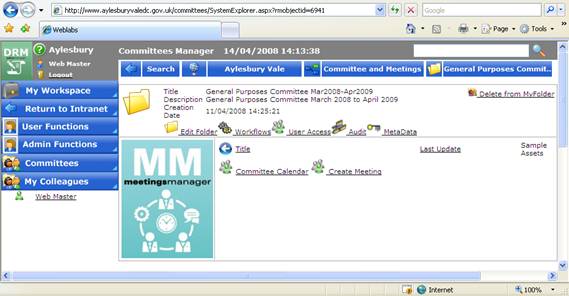
Now you should be returned to the explorer showing the committee awaiting the creation of meetings.
|
|
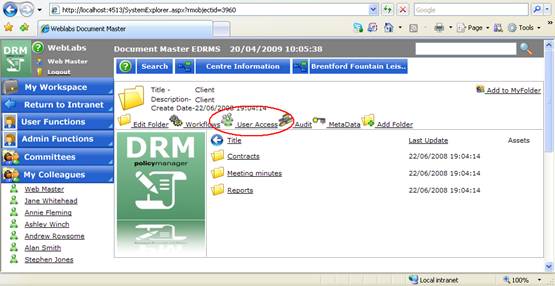
However, before that we add meetings we want to add another user to the system, for example another member of the committee team that needs to be able to upload and view documents in this committee. We do this by clicking on the User Access link which is an Administrator only function.
|
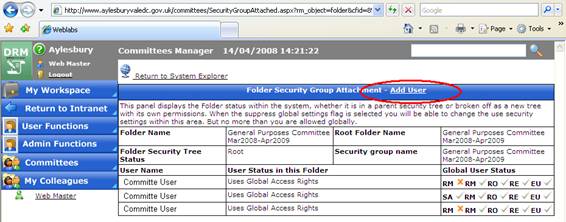
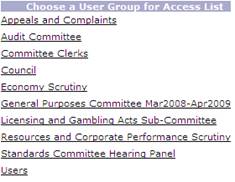
This is the page that lists members of the secure committee area; you can add any one from the users list to allow them access to documents within this area including the meetings included. Note that when you add members to the committee in the meeting viewer later, they are added automatically to this group so you do not need to do that now. Just add members of your team who need to have access.
Click on the Add User link circled in red to view the next page.
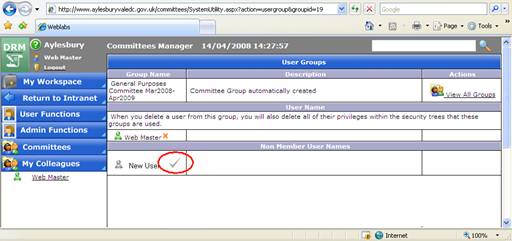
Click on the tick box in the circle to add this user to the user group for this committee. They will now have the same rights as in there existing global user document access rights. For more details view the Document master Guide.
There are two ways to achieve this:
|
|
|
|
|
|
Either way you end up at the Committee Meeting creator page seen below.
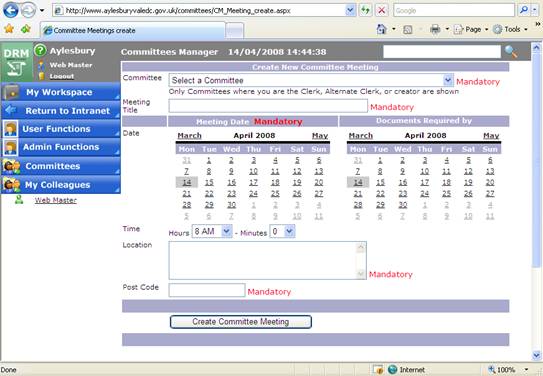
You will firstly note that no committee has been selected, that is the only difference between launching from the committee direct or the way we did it from the Committee bar.
To create a new meeting:
Next if all is ok, you will be returned the committee explorer within the meeting folder. If there are errors they will tell you at the bottom of this page.
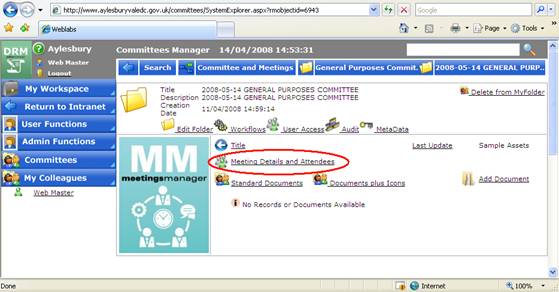
So now we have the meeting created and read to start on the Agenda. Note that as of now this meeting will appear in the Public Committee viewer showing the date of this next meeting and other necessary details.
Click on the Meeting Details and Attendees link circled in red, this will display the main meeting details viewer page.
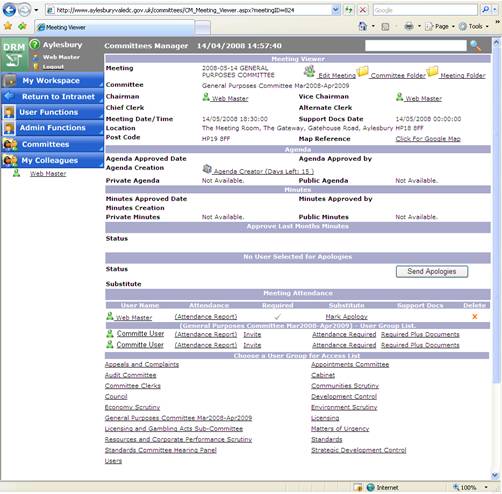
This is the page you will be using quite a lot so let’s have a good look at it.
|
|
This link takes us back to page that is identical to the Meeting creator page, however it allows us to make changes to the meeting. |
|
|
This opens the Committee folder for viewing all meeting held within and access to the committee calendar also. |
|
|
This takes us to the Meeting folder. |
|
|
This opens the Agenda creator tool, more later. |
|
|
We can send apologies for ourselves with this button, however if the mark apology button is pressed then we can mark somebody else’s apology and a substitute here. |
|
|
Shows a list of attendance of a member, but only to those meeting where they were required to attend as opposed to being invited. |
|
|
Mark an apology on behalf of this member. |
|
|
Invite this member to the meeting, no recorded lateness kept. |
|
|
This marks the member as having to attend, if they cannot make it they must in some cases mark an apology or have it marked on their behalf. |
|
|
This means they must attend and supply documents for reports. |
|
|
Use this to remove the record |
|
|
At the bottom of the page you can select a group of users to pick your members from. Most of the times you may want to select the “Users” group as it contain ALL users in the system. However, you can choose any and create your own. |
We have the meeting and now we need the Agenda and reports.
Click on
the ![]() link,
note it may be red if overdue for creation.
link,
note it may be red if overdue for creation.
This is a complicated page and you need to understand how to use it, once you understand the way it works it will allow fast creation of Agenda’s with fast importing and other features. So lets get started.
|
|
Click this link to return to the Committee meetings folder. |
|
|
Click here for this Meeting folder. |
|
|
This link takes back to the Meeting details viewer. |
|
|
This link will open up a new window with a full preview of the private agenda. This is the version that has secure information that is not for public consumption. |
|
|
This link will open up a new window with a full preview of the public agenda. Any secure items on the Agenda will be replaced with an appropriate message selected from the drop down list.
|
|
|
Use the top button to import the agenda items from the last meeting, but only those that were marked as a template item. This way you can easily import often used agendas and modify. vastly speeding up creation of agendas. The pin button just confirms the action and must be pressed. The header, news and footer boxes will also be filled. |
|
|
Use the top button to import the agenda items from the last meeting, note this will copy ALL items. This way you can easily import often used agendas and modify, vastly speeding up creation of agendas. The pink button just confirms the action and must be pressed. The header, news and footer boxes will also be filled. |
|
|
Once you are happy with your agenda then this button will create the full documents of the public and private agenda’s. These are in word format and can then be used to print of paper version of the agenda for manual distribution. Again the confirm button must be pressed. |
|
|
|
|
|
|

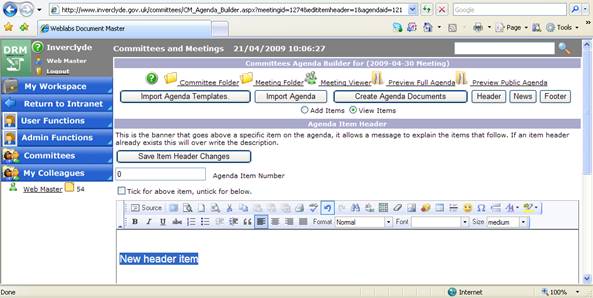
In the Agenda Builder screen you will see this toggle switch. Change this to “Add items” and a new panel will appear.

In here you create your new item with the full text editor.
![]()
Enter the item number, if left blank it will put the next number in. This shows public view, but you can select “Secure View” which then needs a login to see the document.
![]()
If you mark an item as a template, then next time you create a meeting you can import all template items or as shown here just individual items. Tick the box to remember this as a template item.
Title, fairly obvious really.
![]()
You can select a member of this committee and their details will be added automatically, or enter contact details for a person not in the system with maybe a telephone number.
![]()
This is to add reports that are stored within this meeting folder, remember they only show up when they are approved, and for public items, they must be flagged as “public documents” to be added.

This is the editor for typing your content, you can cut and paste from Microsoft Word, but sometimes this can cause display issues.
Once happy press the “Add item to Agenda List” button.

These allow you to modify three different sections of the overall document.
Header is right at the top, then News, then the items of the agenda and finally the footer.
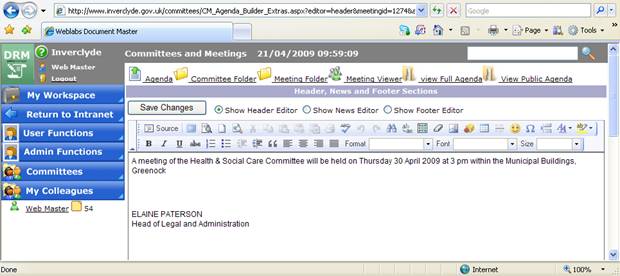
As you can see it is just a text editor with options to change to other sections of “News” or “Footer” and the submit button.
The ![]() link will
drop the changes and return you to the Agenda items page.
link will
drop the changes and return you to the Agenda items page.
![]()
This allows you to put a break within the document for titles, notes etc that are not actually items in the Agenda document but equally important.

You enter the item number and whether you want it above or below that item.
|
|
Once you are happy with your agenda then this button will create the full documents of the public and private agenda’s. These are in word format and can then be used to print of paper version of the agenda for manual distribution. Again the confirm button must be pressed. |
The system has an automated way of creating minutes by importing the items on the Agenda and entering the resolutions on a per item basis. However, from experience we have found through our user base that it is easier and more efficient to upload a completed document for the minutes and attach and sign off. So these instructions will show this method.
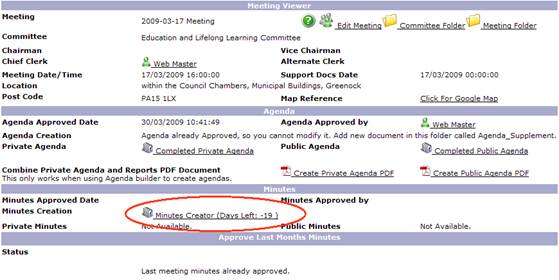
In the meeting viewer window click on the circled Minutes Creator link.
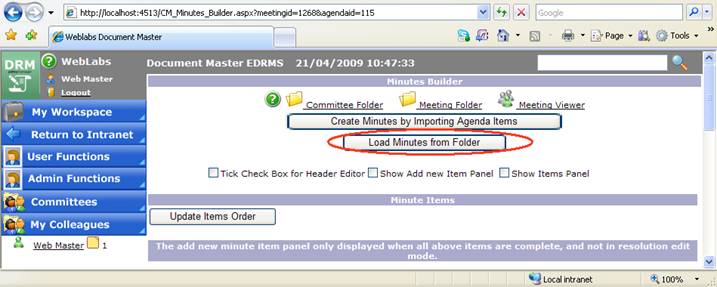
Now assuming you have uploaded a document that has been approved and made public and has the text “minutes” in the title then click on the “Load Minutes from Folder” button.

NOTE: This document will not appear if it is not public and with the text “minutes” in the title.
Now click the “Confirm External Minutes” button

Now you can see the completed minute’s link and this is now also published on the public web site.
Also here it is asking to approve these minutes, if your organisation approves immediately then ok, but some only approve in the next meeting. This can be setup in the main configuration file and it will only show “Approve Last Minutes” button instead.
The policies creation system has two main objectives in relation to the important documents within your organisation. Firstly, it distributes the right document to the correct groups of users making them aware of company rules, policies and health & safety matters etc. Secondly, it ensures that the reader understands the document that has been read.
Understanding is a tricky one because any can tick a box and say I have read and understood. I bet you have ticked to accept licensing box on your software and not read it. That is ok for software but what if it is the escape route from a burning building. So, the system allows you to have the normal tick to agree having read and understood, but there is a second mode that makes the user answer a multiple choice questionnaire to prove they have understand and must pass the test to complete.
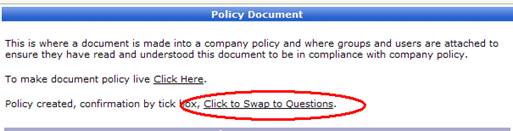
Any document can be setup and what follows is the process to make it a policy document for a group of staff. Firstly login and go to the document that you wish to setup as a policy.
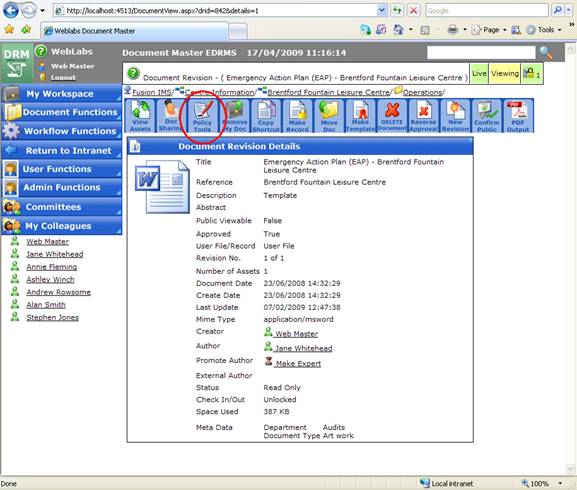
Click on the ‘Policy Tools’ button and open the screen.
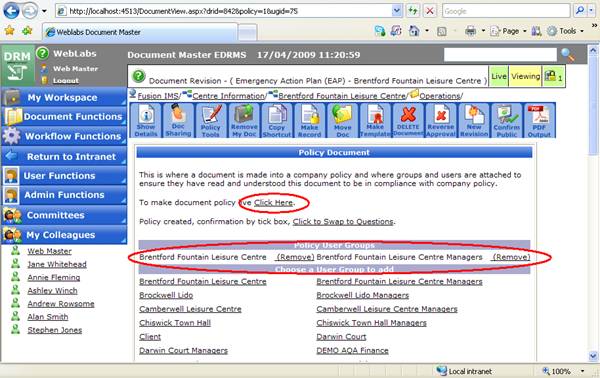
Here you can see the first form that appears, what has happened is that a policy data record has been setup for this document I have created.
In this screen the big red oval is showing two groups of users I have selected as to receive this policy and have to approve it. These can be added by clicking on the group names below, or removed with the remove link.
The top red oval shows the link for making this policy live, just click and then this will be ready. This will now add a link to all users ‘My Workspace’ menu selector on the left and also add to the My Policies link at the top of the welcome page. See image below.
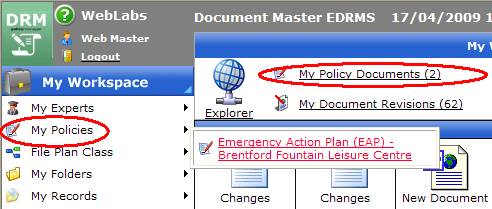
The user can now at any time click on one of these links to view the document and mark policy as read.
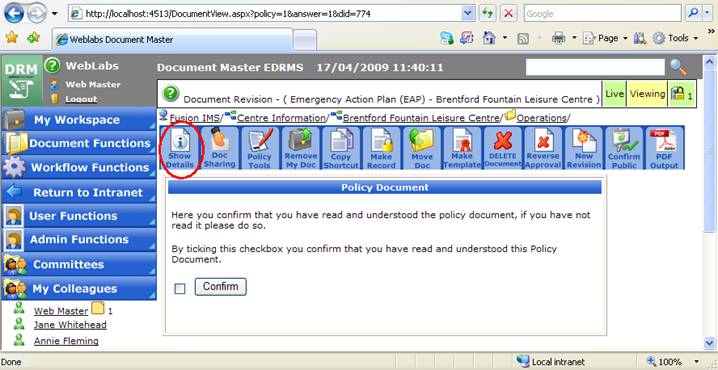
If the user has read the document they can click confirm or click the ‘Show Details’ button and load the document to read first.
If you have an important information document that must be understood as in the case of the building fire escape procedure, then you can set a question and answer session for this document. Note this could also be used as a normal testing document for training etc. Such training documents can include normal multimedia files as part of this training document.
In this same document click on the ‘Policy Tools’ button again and come to this screen. Now click in the link shown above to cancel the policy document so we can change the type.
Now we are presented with a question box with a suggestion box to show the user if the wrong answer is entered.
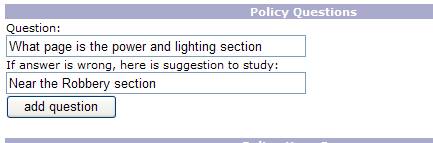
Next page we add answers.
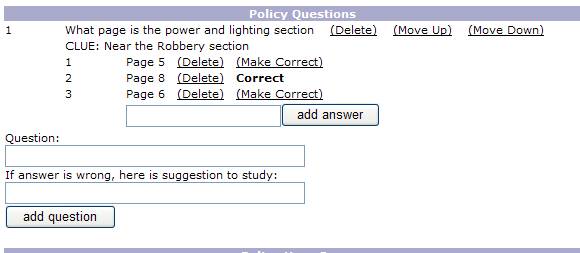
Now you have the question and clue, type an answer in the Add Answer box and from one of the answers click the make correct. If you make an error just delete the ones that are wrong. Try not to add non alphanumeric characters as they may not be accepted. Keep adding questions until finished and then make policy live again.
Now re-enter the policy document link and you will see the question, obviously you need a few to make it worthwhile.
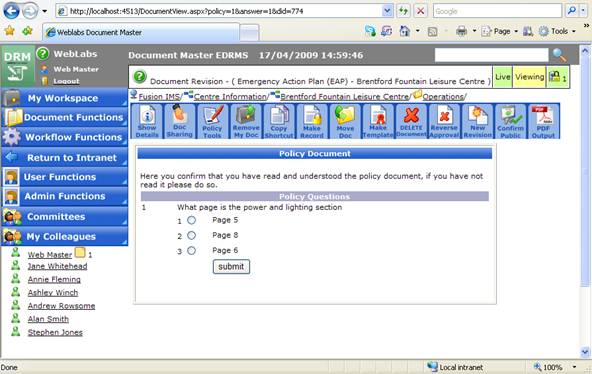
Tick the answer box and because the default pass mark is 75% you will pass with only one question. If you select a wrong answer and overall score is lower than the 75% default then you will see the following.

As you can see the clue is displayed and the user must retry the test by reloading it until they pass, then a message is displayed congratulating them.
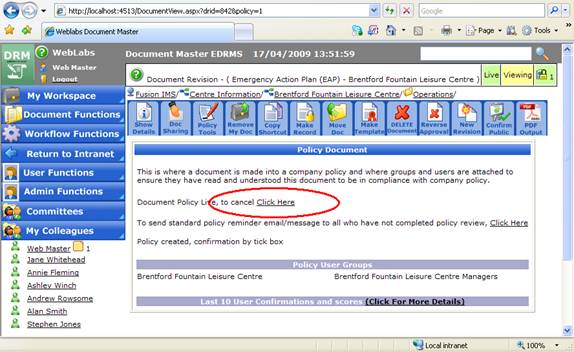
Now it is time to manage this data so go back into the document and click on the policy tools again.

At the bottom of the page is the reporting function, click on the (Click for more details) link.
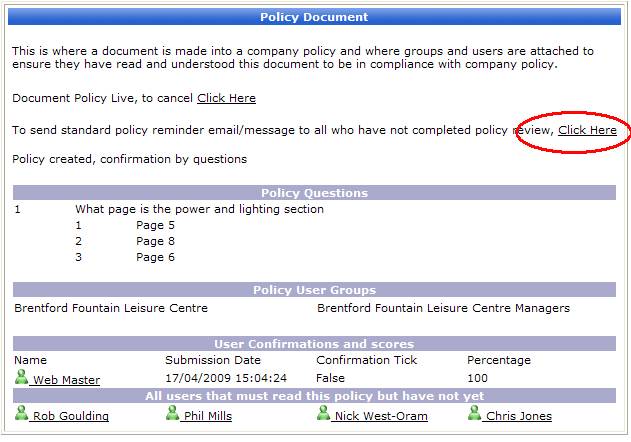
Now you can see at the bottom those that have completed the task with either a percentage or a confirmation and those that have not. For those that are being slow you can click individually on the names to mail them a reminder or click on the highlighted link that sends a reminder to all who have not completed the task.
That is policies but try using it in testing your user’s mental knowledge or quick fire questionnaire competitions, you could even use it as a basis for a quiz competition.
There are certain functions that you would only want performed by an administrator or more experienced user, these include the file plan, user accounts and workflow maintenance to name a few. What follows are the notes that these super users need to do there work.
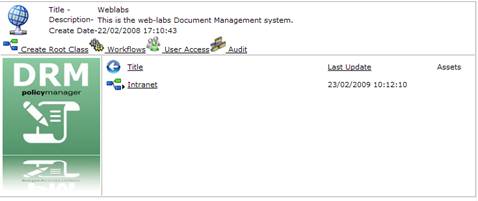
Class / Folders – what is the difference, well technically not much except that folders can hold files and classes can only hold folders. Basically, the Class is an object that describes a part of the organisational structure or function within that organisation. The folders are the structure for holding documents and assets within that organisational structure. You cannot create a class within a folder structure and folders cannot be put into another folder if it contains document or is setup to, and you cannot create a folder inside a class that has other classes, sorry if that sounds complicated but rules are rules and we are bound by them.
 Let us start by clicking on the file
plan explorer in the welcome page.
Let us start by clicking on the file
plan explorer in the welcome page.
Only one Class has been defined, but you can see the ![]() link.
Click on this as it is the only way to put a new main branch in the root of the
file plan.
link.
Click on this as it is the only way to put a new main branch in the root of the
file plan.
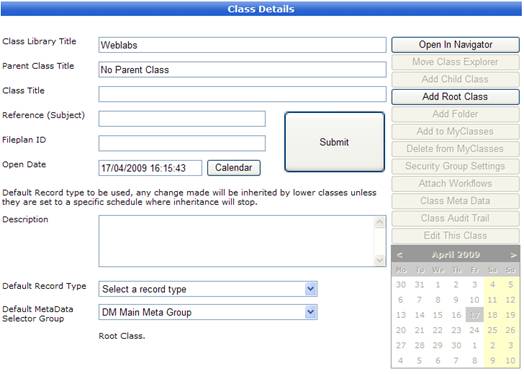
From now on when you edit the file plan the top two boxes cannot be edited, so you need to enter a title, reference and description in each of these fields even if they are the same value. To change the open date click on the Calendar button, this is so you can signify when a folder was opened originally even if in this system it is not today. The system keeps a created date any way as well as the Open date.
Select the General Records type and the DM Main Meta Group as default, later on in the plan these usually get inherited.
Click the submit button and you will have a new root class.
Remember you cannot create a class inside a folder!!

Click on the Add Class link and a similar screen appears, fill in the details and another class is created here.
Remember: you cannot create a folder inside a class that has other classes.
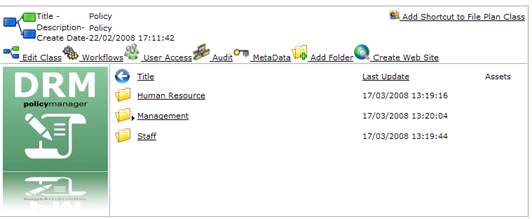
Click on the Add Folder link.
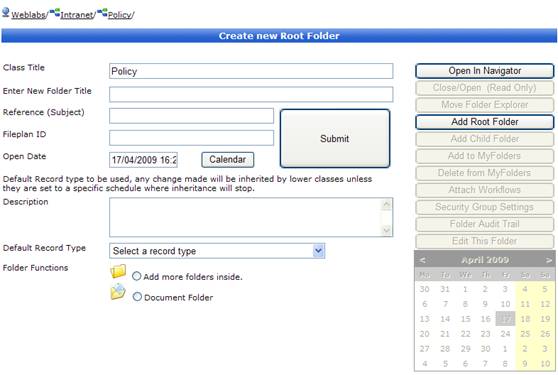
Again similar to add class function but this time you have the option to add more folders or add documents. Once set this cannot be changed without deleting document and deleting the folder.
![]()
This will now allow more folders below this folder to continue your file plan.
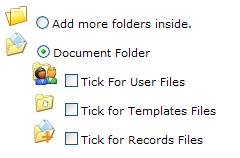
However, if you click on the document folder link you are given option to create different kinds of document folders or more than one type of document in this folder.
![]() These are purely normal
every day documents.
These are purely normal
every day documents.
![]() These are for holding template
documents.
These are for holding template
documents.
![]() This enables this folder to
hold records.
This enables this folder to
hold records.
Records are special documents, basically a record can hold one or more normal documents but these cannot be deleted and are controlled by a company setup lifecycle policy. So certain documents may be kept for ten years or a lot more without deletion. Be careful setting documents as records because they cannot be deleted, not even by and administrator.

Note the Delete Empty Folder link, this is the only way to delete folders, and only viewable when all documents are deleted. You will also see delete Class links, again these must contain no folders or other classes. If you have documents deleted, then setup the trashcan folder ID in the web.config to point to any document folder and deleted documents will be moved there. There is also a web service call that will move all deleted document records and audit trails to this global trashcan. Remember deleted documents keep all audit trail information for ever.
![]()
This link will be covered in another chapter but enable any Class folder structure to be a new web site. So for example a Class section called Marketing could be a default web site with promotional material. Or a personal folder structure can be turned into a mini web site.

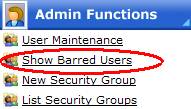
In the Admin functions bar is the account creation tool, click this and enter new account details.
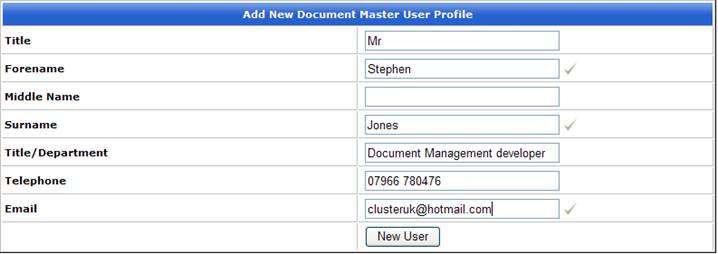
This brings us to the global user permissions window.
Here we set the users global permission and the groups they are a member of.
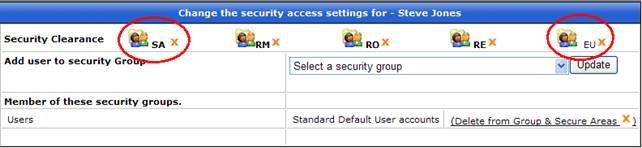
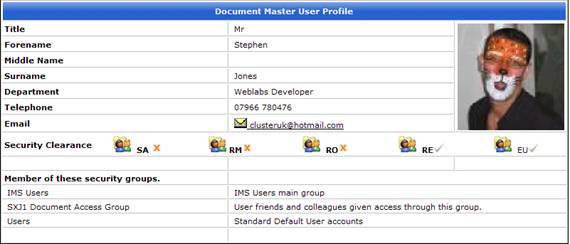
SA: System Administrator. RM: Records Manager, RO: Records Officer,
RE: Reviewer (Read Only), EU: End User (Read/Write)
Just tick on the icons to change status, and select another security group to make a member.
Now select the user maintenance or directory tool and find the user for more options.

![]() Bar the user from accessing the
system.
Bar the user from accessing the
system.
![]() To unbar the user, and give access to
system again.
To unbar the user, and give access to
system again.
![]() This button allows the user to have a
fresh password that they can change. The administrator can see the new password
and then the user can change it.
This button allows the user to have a
fresh password that they can change. The administrator can see the new password
and then the user can change it.
![]() This button allows administrator to
change the user’s security access.
This button allows administrator to
change the user’s security access.
![]() This button enables the user account
details to be changed.
This button enables the user account
details to be changed.
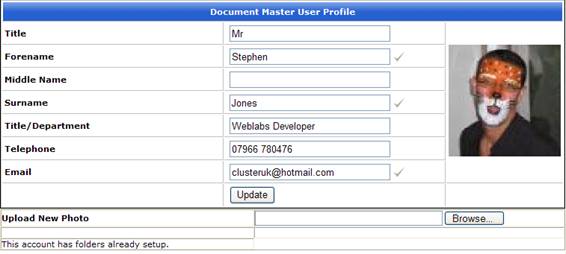
Whilst most users do not like this, a user photo can be upload which is very useful.
Also each user can, under the discretion of administrator, have personal folders in their own secure area. Again this user can be setup with their personal web site as well.
![]() View user account details
View user account details
![]() Just
click on this link and now this user will appear on any of My Colleagues lists
or drop downs.
Just
click on this link and now this user will appear on any of My Colleagues lists
or drop downs.
![]() Click
this link to remove user from My Colleagues.
Click
this link to remove user from My Colleagues.
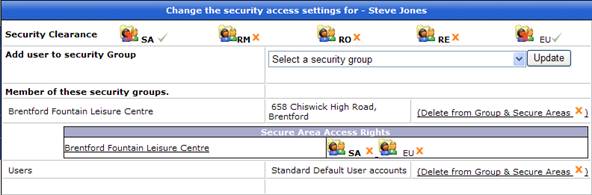
By default the root of the file plan has the “user” security group attached to it using the default global rights of these users. This means that anybody with at least RE status can read any approved document in the system. It is possible to change the default to stop this user group being used but for most cases it is unnecessary to do so.
SA – System Administrator, RM – Record Manager, RO – Record Officer, RE – Reviewer (Read Only), EU – End User (Read/Write).
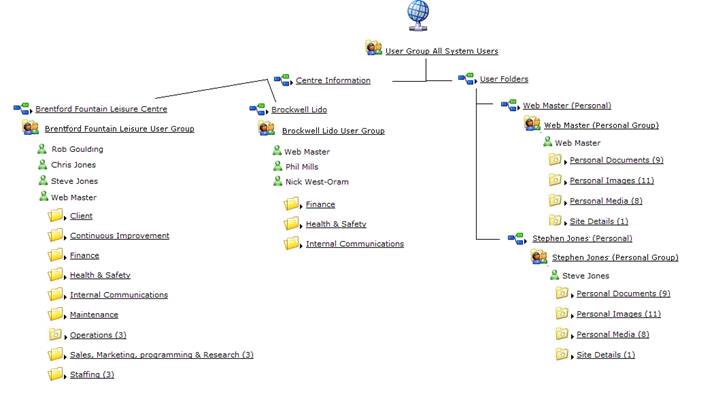
The security setup of this system is based on the principle of the upside down tree, see the above simplified sample. At the top by default all users can have access but at any point a branch can have a new user security group attached with different security rights. You can even change the rights of that user within this new section by removing some of their rights, but you cannot add.
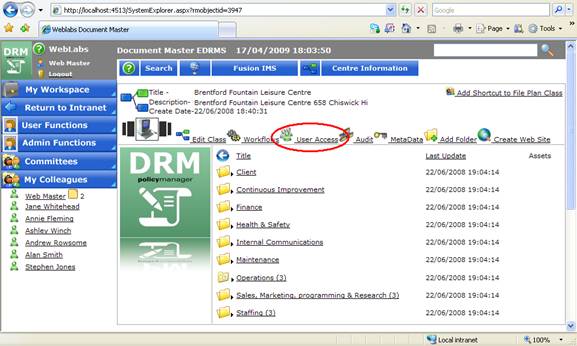
Click on the user access link.
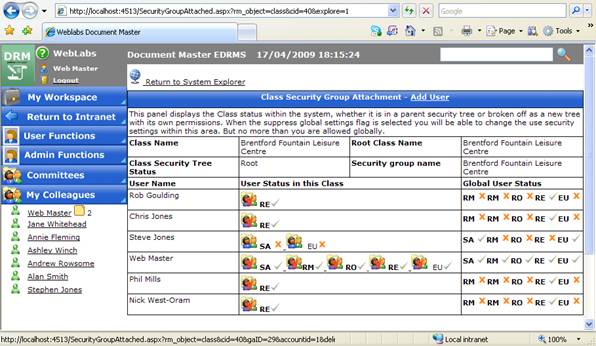
You can see on the previous image that it is using the “Brentford Fountain Leisure Centre” security group and contains the users you can see. On the right you can see the users global permissions and on the left their actual permissions in this area of the file plan downwards. Note that permissions can only be removed and not added.
This is the way that we break the tree then create a new secure area with different folder security access within the file plan structure. Remember any changes propagate down through the file plan tree until broken again. It is important to design your file plan and security tree structure and not just throw it together, whilst you can modify it, it is best to think first then act.
Firstly go to an area of the file plan that you want to break off with different user group and/or workflows.
You can see here that we are in the “Centre Information/Brentford Fountain Leisure/clients/” folder.
Click on
the ![]() link.
link.
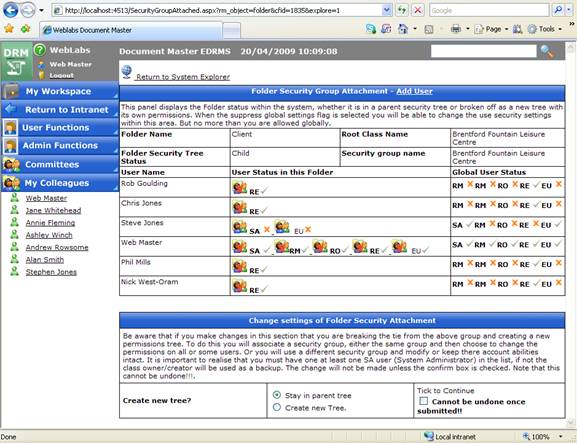
Now you can see the group being used in this area and the users/permission. Now we want to change this by breaking the tree further down with a new permissions structure. So look at the bottom of the page and see the “Change Setting of Folder Security” panel. Note once these changes are made, they cannot easily be undone.
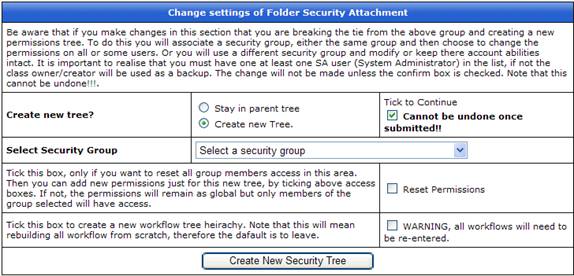
This now opens a lower panel, in which you can see the “Select Security Group” option. If the group is not created you should go and create it and populate it first. Then choose the group of users to have access to this area.
![]() This
tick box when checked disables all user’s permissions and forces you to reset
them for this area; if you leave it un-ticked then this area will use their
global permissions.
This
tick box when checked disables all user’s permissions and forces you to reset
them for this area; if you leave it un-ticked then this area will use their
global permissions.
![]() This
box sets this area of the file plan to have no workflows and to use the Quick
Workflow system until you create some manually, if left it will inherit from
above. See more on this in the workflow maintenance area below.
This
box sets this area of the file plan to have no workflows and to use the Quick
Workflow system until you create some manually, if left it will inherit from
above. See more on this in the workflow maintenance area below.
Once
happy click the submit button to create a new break in the tree.
The EDRMS has a flexible workflow system designed to enable many kinds of document and record based workflows, these are mostly organised around the approval, rejection and redirection of various tasks. The first part of task creation is to create a generic workflow, defining the task, steps, and type of user or groups that need to approve the workflow action. There are no specific details at this stage; this is so you can reuse them. This is then added to a pot of workflows to choose from and use throughout the file plan.
Note: that when you break the security tree, you get the option to reset the workflows for this area. If you do this then all work flows need to be recreated using the pool of workflow tasks already created, if none are created then quick workflows are used instead.
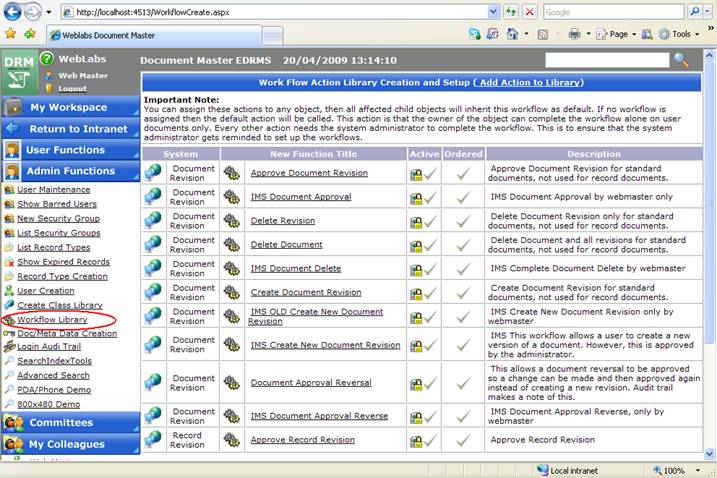
This is the workflow library page which can be reached by clicking on the “Workflow Library” link in the admin functions menu panel. Click on one of the links say the “Approve Document Revision”.

In this
panel you can see only one ![]() task. This is because once the
workflow is launched it only needs to be approved by a member of a specific
group with the Access level of “End User”. It could have been set to a “User
Action” instead, but this then limits the task to only one specific user in the
system. In the create workflow example below we will create two levels of
approval although there is no actual limit apart from a practical point of view.
task. This is because once the
workflow is launched it only needs to be approved by a member of a specific
group with the Access level of “End User”. It could have been set to a “User
Action” instead, but this then limits the task to only one specific user in the
system. In the create workflow example below we will create two levels of
approval although there is no actual limit apart from a practical point of view.
Note: Quite often groups are setup that are not to be used for security but purely for workflow approvals.
We are going to create a task to make a document that has already been approved to be public, note that when it comes to selecting the task there are many, but the process is the same.
![]()
At the top of the Workflow library panel is a link to “Add Action Library”, click on this to open panel.
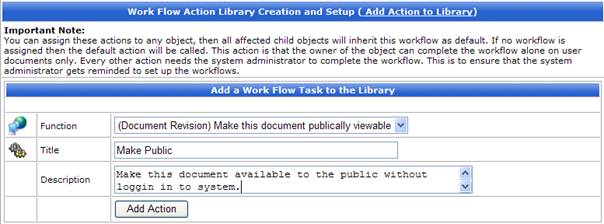
Here you can see the function selected and the title, ensure you put a good description because the titles are sometimes a bit generic and must not be too long, 50 characters or less is best. Once done then click the “Add Action” button.

Now you can add a step to this approval process, note you must add at least one step or it is a waste of time. At this stage we are not specifying names of users or group just the type of authority. So choose group approval action or user action and what level of access the user needs to have.

Now you can see two approvals required for this step, we
can delete individual steps using the ![]() icon or change the order with the
order icons. If you want more steps then keep going, but once happy click the circled
icon to activate this workflow in the library, it will turn into a tick to show
live.
icon or change the order with the
order icons. If you want more steps then keep going, but once happy click the circled
icon to activate this workflow in the library, it will turn into a tick to show
live.
Note: that once this gets used it will be locked and will show a padlock. While locked it cannot be changed or deleted.
Now we want to actually use this some where in our file plan, remember we can use this same workflow in different parts of the file plan with different groups of users but constrained by this template. Sometimes you will want different versions of this workflow but if you think about long term needs then one will do.
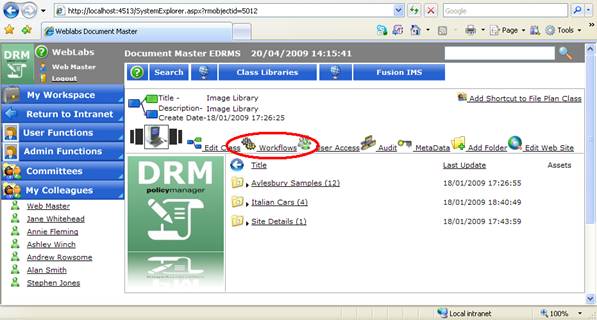
Click on the ![]() link circled in red.
link circled in red.
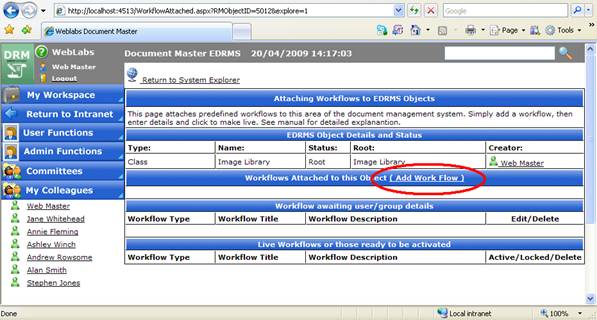
Click on the “Add Workflow Link”.
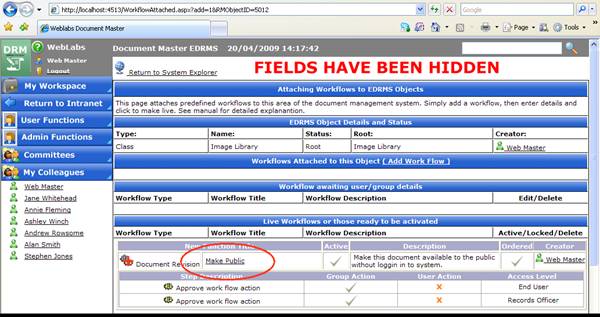
Click on the circled link to add this workflow to your page, note that this list would be longer normally.

Click on the circled icon, this allows you to edit the fields.
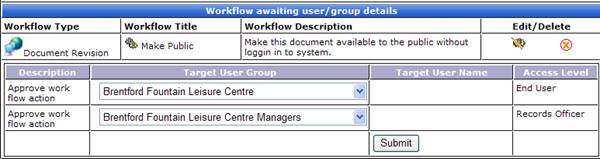
I have selected the fields for the two steps, note the first is just the normal users group at this centre, but the second is by a managers group. Once happy press the submit button.
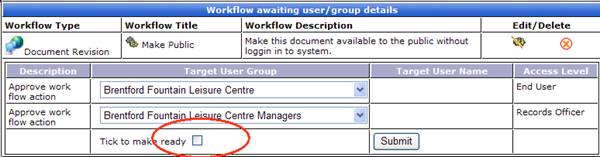
Now the system makes you confirm you are happy with this selection by ticking the make ready box and submitting again.

Now as it stands this is still not live so there is just one more step, click on the circled cross icon to make live. This may seem an annoying step but it is just there fore system security.

Now you can see it is live, but what if you want to reverse it or delete it, just click on the “Active/Locked/Delete” tick.
![]()

Now it is offline, and to delete it just press the delete
icon![]() ,
note that this will completely remove this instance. If you need to make
changes, just delete it and start again.
,
note that this will completely remove this instance. If you need to make
changes, just delete it and start again.
NOTE: once a workflow is in use, i.e. launched, then you cannot delete it or take offline until that workflow is completed or rejected.
Now when you go into a document within this part of the workflow and it is approved, you will see this workflow. Remember workflows are only visible when they should be used and not until.
The one thing needed these days with any document store is the easy access and presentation of public and secure information through a web portal look and feel. The way that Document Master is designed enables many different web sites built into the system with varying levels of security and ease of creation.
Basically, any Class that holds a folder structure can have its own web site attached with just the click of a few buttons and the upload of a custom banner image. Even users private folders can be set up to have a web site for personal usage.
So let’s see how easy it is to create my own personal web site, note that all site creations are the same.
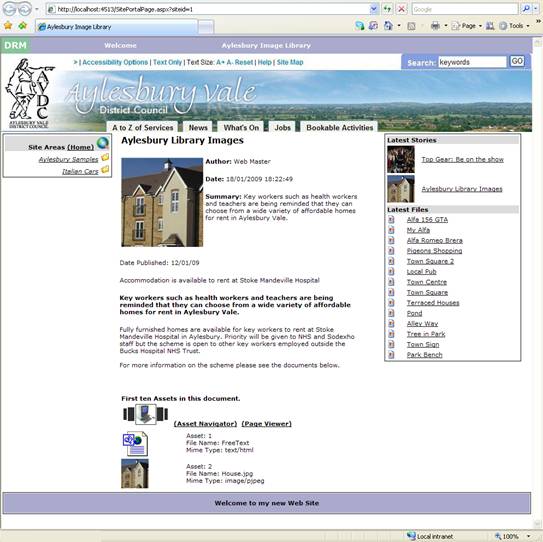
Any document that you create will appear in the web site, but if you want to put out a normal web page story just create a new document using the HTML editor and add an image as asset number two. Then once approved this will appear in the page as a web story rather than a file access.
Click on my user folder; note that (a) it is the bottom level class, and (b) that it can be any class within the system.
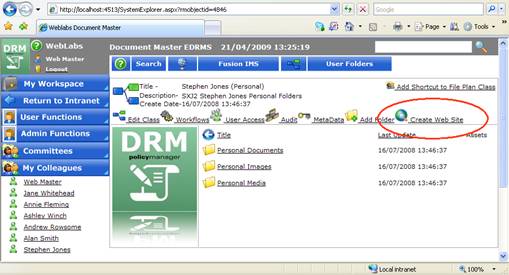
Now click on the ![]() link to get started.
link to get started.
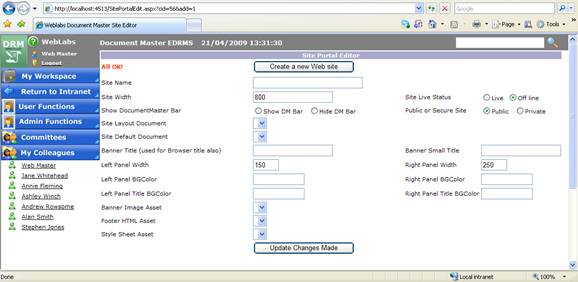
![]()
Click on the “Create” button and then click on “Confirm” button.
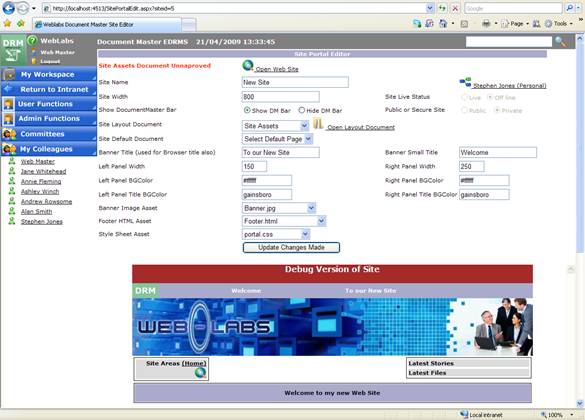
You can see on the screen shot that the site has been created and appears in the bottom of the picture in an iFrame.
![]()
This message is just saying that it cannot go live until you approve the site assets document which is a single document that holds all of the assets for the site look and feel.
![]()
Click this icon to view the web site, when viewing, if the DM bar is active, click on the left green DRM logo to return to this page.
![]()
Obvious really
![]()
Width of the viewing area, 0 means full width of window.
![]()
Shows the banner at the top for returning to DMS
![]()
This is the document that holds the site assets, do not change.
![]()
This is the first page people see as a home page.
![]()
This is used for building the Banner title by adding the messages together.
![]()
These two values set the width of the left and right hand menu bars, which allows you to layout the text better for links and folders and documents.

These are the background colours for the menu header box and normal panel.
![]()
Choose an image from within the site details document to use for banner. Just upload a new banner into the site details document to change.
![]()
This is the HTML used for the footer of the site, this can be any valid HTML with images and maybe embedded script.
![]()
To change the style sheet, just upload it into the site details document and any file with .css file type can be chosen.
![]()
Click this link to go to the file plan view.
![]()
Note these are greyed out because the “Site Details” document has not been approved. Once document is approved then the Live/Offline selector will be available.
If you want the Public/Private selector then the “Site Details” document must be public.
![]()
This link takes you directly to the “Site Layout” document for asset changes and approval.
Now any you can link to the web site and you will notice that there is a login box for letting you get to private documents.
This site is now populated automatically by document created within the folder structure, and private documents are only viewable when the user is logged in and has the rights to view them.